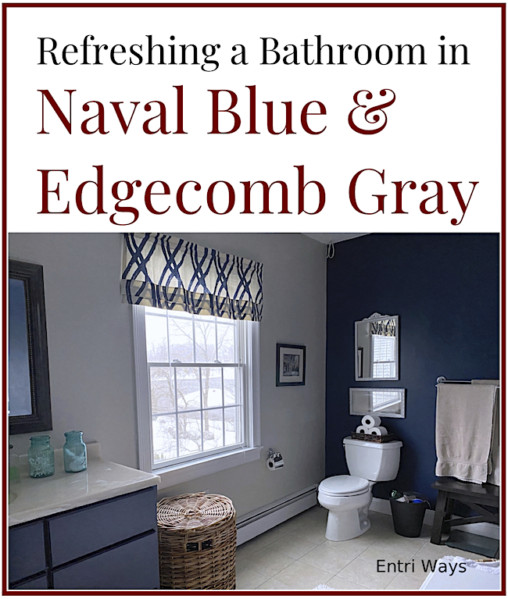
Your bathroom is looking tired and dated and, quite frankly, a little dirty from years of dust and humidity. You start to dream about what a bathroom makeover would like… and painting leads to fixtures… a new mirror… new lighting… and cabinet hardware. Oh my! Your little refresh just turned major. But it doesn’t have to be that way. Today, we’re talking about working with your current bathroom fixtures and refreshing a master bathroom in colors that work for your space – in this case, Naval Blue and Edgecomb Gray.
.
The ‘Before’
Fifteen years ago, I thought chocolate brown walls were a good idea. At the time, I wanted a color that would complement the tile and a countertop that had swirls of beige and cream. A color that blended with the stained cherry cabinet and warmed up the walls of this big-box-of-a-bathroom.
And it did. For many years I was fine with it.
Until now.
I was ready for an update.

.
The List
This was not going to be a major bathroom renovation. It just needed some repair and cleaning. It was not necessary to gut the room because the tile, cabinet, toilet, faucet, mirror, and towel racks are in good condition. And while I wouldn’t mind changing up the beige tile, I decided to work with it.
Before I tell you about the paint colors though, there was one very important thing we had to fix first…
.
Replacing the Inadequate Exhaust Fan
If I had a to pinpoint the main reason why this bathroom got so dirty and dingy, I would have to say it was because of the inadequate exhaust fan in this room. Let me explain…
When we built our house twenty years ago, my very specific instructions to our electrician were to get us the strongest bathroom exhaust fan on the market. And at the time, he may have, but the 4-inch exhaust pipe was clearly undersized for this bathroom and it did not work!
Humidity in a bathroom can lead to caked on dust, mold and other problems – like the massive drips of water on the bathroom walls that we experienced. If you look closely at the above and below photos, and here’s a “not-so-pretty” video showing you the ‘before” too, you can see them.
What happens is the humidity builds up so much, the condensation drips down the walls, then cakes on and becomes like glue because it did not dry out quickly enough.
So the first step in this bathroom refresh project, was to fix the issue that caused the problem. That meant installing a larger, stronger fan with a 6-inch exhaust pipe.
My husband is very handy and was able to do this himself, but if your bathroom mirror has steam on it when you shower, it’s well-worth hiring a professional to install a new fan.

THIS is the fan we purchased at Lowes. I don’t see the exact model on Amazon, but THIS one on Amazon looks very similar. It is 150 CFMs and fits a 6-inch duct (not the smaller 4-inch). It works great! No more steam in the bathroom. No more fogged mirror. And no more water dripping down the walls!

.
Repairing the Bathroom Walls
Now that the humidity problem was solved, let’s move on the other big issue in the bathroom… the WALLS!
I tried a few things to remove the gluey drips that were all over the walls –
- Washed them with Dawn liquid soap – which usually breaks down glue.
- Washed them with Tilex soap scum cleaner to remove any excess soap.
- Sanded and scraped the bumpy areas.
This seemed to remove the mess and smooth the wall. Until I primed them. The primer barely covered the problem areas so I knew the paint wouldn’t either.
There was only one thing left to do… skim coat the problem areas with joint compound. Once the joint compound dried (24 hours), I sanded the walls smooth and primed again. This worked. The walls were now prepped for paint.
.

.
Painting the Bathroom Cabinet
The third problem I had with this bathroom was the color of the bathroom cabinet. You can see in the photos above the cabinet was a stained cherry wood. The cabinet is really nice and was the exact same finish as our kitchen cabinets (which I love); but our upstairs finishes are much cooler whites, blues and a dark, black-brown (not redish) dresser.
So we decided to paint the cabinet one of my favorite colors – navy blue! You can READ MORE on that HERE

.
Choosing Wall Color(s)
One thing I’ve learned about choosing wall colors is to go with your gut. Stand back and think about your favorite colors and work from there.
One of my favorite colors is navy blue and I knew i wanted some navy blue in this room (in addition to the base cabinet). Years ago, before the walls were brown, this room was actually white. It made the room feel very large and cold, so I knew I needed some color on the walls.
I’ve always wanted to try a navy blue room, BUT you can see from some of the photos and in the video that navy can look black if there’s no light reflecting off it.
There’s a lot of ‘BUTs’ in this post aren’t there? That’s only because I kept weighing my options and I want you to have an understanding of the thought process. This project was about working with what we have and was not meant to be an expensive renovation.


You can see that the floor tile and the vanity counter are both beige with cream swirls running through them. So in order to balance the navy blue with the beige, ensure that the two colors didn’t completely clash, and paint the walls in a way that it didn’t look like a black box, I opted to paint one wall the same beige color as the floor tile and countertop.
The walls are Sherwinn Williams Naval and Benjamin Moore Edgecomb Gray. It’s a color combination that you may not see all over Pinterest, but it works in our master bathroom because of the permanent fixtures in here and the other colors in our adjacent master bedroom.
I think the wall also would have looked really nice painted with Benjamin Moore Cloud White which is the other lighter color in the tile and countertop and that on the walls of our master bedroom .
The Cloud White is like a winter white (not pure white like the shower curtain or pure white woodwork you see in the photos). Both the Edgecomb Gray and Cloud White also coordinate with the window valance I made from our master bedroom curtains.
So if the bathroom needs a refresh again when I paint our bedroom, I may try that, but for now, the two colors together feel both warm and colorful all at the same time.

.
Hang a New Window Valance
Read THIS post to see how I made the window valance from the curtains in our master bedroom.

Disclosure: This post contains affiliate links to products I use and love myself.


Looks great Vicki! The fan is key!
Thank you Diane! Yes, paint makes things feel better… cleaner.