Happy Monday everyone! I have a fantastic project to share with you today. Well, actually, I asked my new friend , Jenni from Roots & Wings Furniture, to share her tutorial on repurposing a door into a custom headboard. Jenni and I work under the same philosophy of refinishing and repurposing the furniture pieces you already have to transform your home. This door headboard is just one of Jenni’s amazing furniture transformations so be sure to visit her and see them all!
Hi there!
Thanks so much for having me Vicki. As she said, I’m Jenni from Roots & Wings Furniture where I teach you how to transform your home one project at a time!
Today I have a fun, easy DIY project that will add a ton of character to your bedroom.
Having a bed pushed up against a wall is fine, but adding a headboard helps your space look so much
more polished and finished. You can easily do this project for under $100, and you can
customize it for any bed size. Ready to get started?
How to Make a Door Headboard
Step 1: Find a door
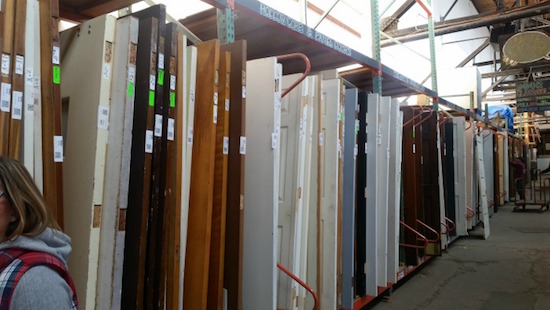
I headed to my local home building supply store where they have a TON of doors to choose
from. There are usually stores just like this in most cities, where they collect used home
supplies and re-sell them. It’s a great place to get unique items to add character and charm to
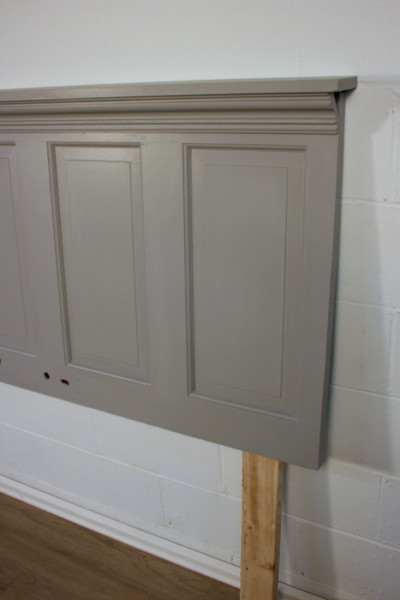
your home. I picked a solid wood door with a few inset panels for detail.

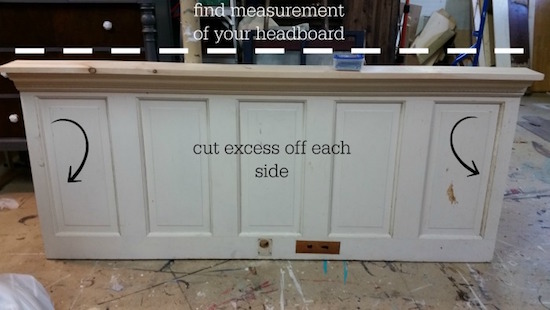
Step 2: Measure and cut
Measure the door and cut off the edges to get the desired width.
Standard mattress widths are as follows:
Twin: 39”
Full: 54”
Queen: 60”
King: 76”
Headboards are usually sized with an additional 2-4” on each side of the mattress.
You can really make it any size that works best for your space, these are just some guidelines
to get you started!
Cut the door to size using a circular saw or jig saw.
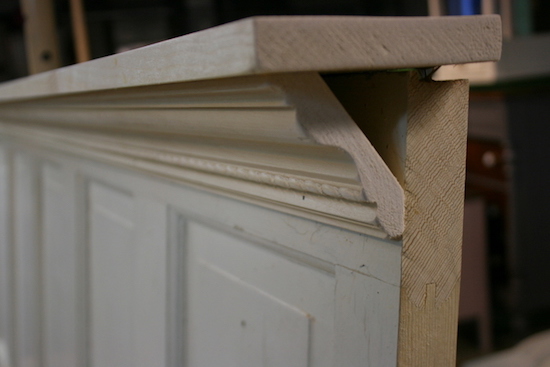
Step 3: Cut and apply your trim
Adding trim to the top of the headboard really gives it a nice finished appearance. I used a
piece of crown molding and a 1×4 for the cap. Cut these to size and attach using glue and a
nail gun.
Step 4: Sand and prep for paint
Sand the edges of the wood trim, scrape any peeling or cracking paint from the door and clean the whole thing (I use a 50/50 solution of denatured alcohol and water for cleaning).
Step 5: Paint!
It’s no secret, my favorite go-to furniture paint is General Finishes Milk Paint. It’s easy to apply and goes on nice and smooth, giving a professional finish every time. I used a custom mixed gray color (4 parts Snow White, 1 part Driftwood). Apply with a nice brush and let dry.

One quick trick for you… after the first coat of paint, if there are any rough spots, especially on the raw trim wood, wrinkle up a piece of paper bag or kraft paper and “sand” with that. It will take off any rough-ness without taking off the paint! Once you have done that you are ready for a second coat.
Step 6: Add 2×4’s to attach to bed frame
This is optional, as you can just hang the door on the wall using a Hangman Hanging System. However, if you’d like to attach the headboard to your bed frame, add 2×4’s to the door.
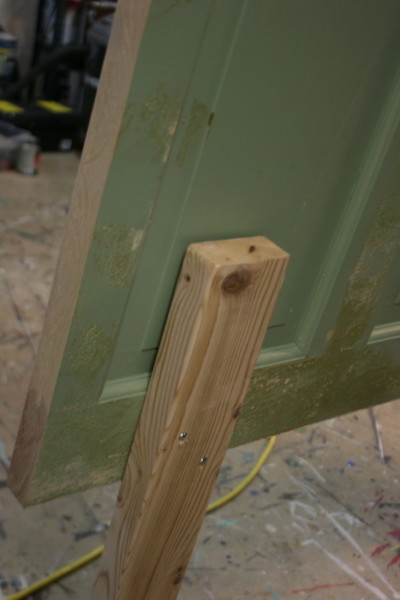
I just attached using 2 screws. Now you can use bolts and nuts and bolt this directly to the metal bed frame.
Step 7: Step back and admire your work!
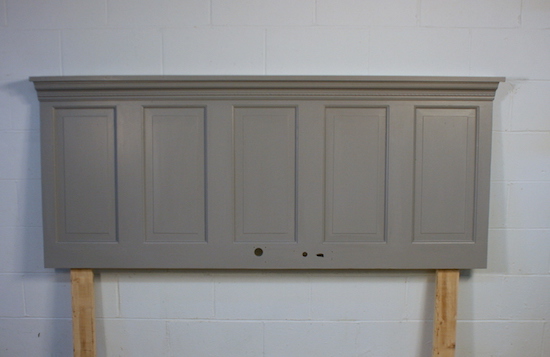
You now have a beautiful, unique headboard for your room!
I hope you’ve enjoyed this simple upcycle project! I love how this turned out, and I can’t wait to make another one!!
For more fun DIY tutorials and painting tips and tricks, visit me over on my blog! http://www.rootsandwingsfurniture.com/blog
If you’d like to furnish your home for pennies, click the image below.
You’ll receive FREE, immediate access to my newest ebook:

I even reveal how I make my biggest profits flipping furniture!


Leave a Reply